
Most badminton players have never thought about the eight bevels on their racket handle.
They grip, they swing, they adjust by feel. And for casual play, that is fine. But at the competitive level — particularly in doubles, where the difference between a deceptive serve and a readable one can come down to millimeters of grip rotation — understanding the eight bevels on your racket handle is foundational knowledge that most players simply never acquire.
This is one of the most overlooked technical areas in badminton. Coaches rarely teach it explicitly. Players rarely ask. Yet grip position relative to the bevels determines racket face angle, wrist freedom, swing path, and deception capability on every single shot you hit.
Here is a complete breakdown of all eight bevels, what they mean, and why they matter.
What Are the Eight Bevels?
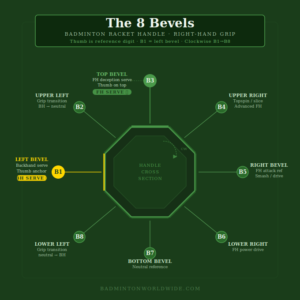
A badminton racket handle has an octagonal cross-section — eight flat faces running along its length. Each flat face is called a bevel. For a right-handed player holding the racket in a handshake grip with the frame vertical, the bevels are numbered B1 through B8 starting from the left bevel and increasing clockwise around the handle.
The thumb is the primary reference digit for locating bevel positions. Where your thumb sits on the handle determines the angle of your racket face, the freedom of your wrist, and the range of shots available to you from that grip. Knowing exactly which bevel your thumb is on at any moment gives you precise, repeatable control — and therefore genuine consistency and deception.
The eight bevels at a glance:
- B1 — Left bevel. Primary backhand serve and backhand shot reference. Thumb anchor for all backhand serve grips.
- B2 — Upper left bevel. Transition zone between backhand and neutral grips.
- B3 — Top bevel. Primary forehand deception serve grip. Thumb sits on top for moderate deception capability.
- B4 — Upper right bevel. Topspin and slice serve territory. Advanced forehand grip position.
- B5 — Right bevel. Forehand attacking grip reference.
- B6 — Lower right bevel. Power forehand drive position.
- B7 — Bottom bevel. Neutral reference point.
- B8 — Lower left bevel. Transition zone approaching backhand grip.
B1 — The Backhand Serve Foundation
B1 is the most important bevel for doubles servers. It sits on the left side of the handle when you hold the racket in a natural handshake grip with the frame vertical. When your thumb is placed flat against B1, you are in the correct backhand serve grip position.
All backhand serves — low, flick, and push to body — are executed from B1. This single bevel position is the foundation of the entire backhand serve game. The deception in the backhand serve does not come from shifting between bevel positions — it comes from what the wrist does at contact while the thumb stays anchored at B1. A low serve and a flick serve can be delivered from the exact same B1 thumb position, with only the wrist release timing differentiating the two outcomes.
This is precisely why B1 is so powerful and so underappreciated. Most players who serve backhand have found this position intuitively but have never named it. Naming it gives you the ability to find it deliberately, drill it consistently, and return to it reliably under pressure.
Significance: The anchor for all backhand serves. Thumb on B1 enables low, flick, and body serve from identical preparation. The single most important bevel for competitive doubles servers.
B2 — The Backhand-to-Neutral Transition
B2 sits one step clockwise from B1 on the upper left of the handle. It is a transition bevel — the grip passes through B2 when shifting from a backhand serve grip to a neutral or forehand ready position after the serve.
Players who are aware of B2 as a transition point can make grip changes faster and more deliberately between the serve and the first rally shot. In fast doubles exchanges where the serve is returned quickly, a clean B2 transition means your hand arrives at the correct forehand position a fraction sooner — and fractions matter at competitive level.
Significance: Grip transition zone. Critical for fast post-serve grip changes. Awareness of B2 accelerates backhand-to-forehand transitions in doubles rallies.
B3 — The Forehand Deception Serve Grip
B3 is the top bevel — the flat face sitting uppermost when the racket is held in handshake orientation with the frame vertical. With the thumb placed on B3, the grip rotates slightly from neutral, giving the wrist additional freedom to roll through the cork at contact.
This is what makes B3 the primary forehand deception serve position. From a B3 thumb placement, a server can produce a tape-hugging low serve, a topspin serve that descends faster, or a flick serve — all from the same preparation and backswing. The returner sees the same grip and the same setup. Only the wrist timing at contact changes the outcome.
B3 offers moderate deception. It is the right starting point for any competitive player developing forehand serve variety, because it balances control with the wrist freedom needed for multiple outcomes. More aggressive deception positions like B4 exist, but B3 is where forehand serve development should begin.
Significance: Primary forehand deceptive serve grip. Thumb on B3 enables low, topspin, and flick serves from identical preparation. The forehand equivalent of B1 in terms of importance.
B4 — Topspin and Slice Territory
One bevel clockwise from B3 places the thumb at B4 on the upper right of the handle. This grip rotates the racket face slightly closed, which — combined with an upward brushing motion at contact — maximizes topspin generation on the forehand serve. It is also the position from which slice serves are most naturally executed, as the closed face angle allows the strings to cut across the cork rather than pushing straight through it.
B4 is advanced territory. The closed face requires precise compensation in swing path to keep the serve low and legal. Players who grip at B4 without the corresponding wrist technique tend to serve into the net. However, when mastered, B4 topspin serves produce the most dramatic fast-descending trajectory of any forehand serve variation.
B4 can also serve as a strain-relief alternative for players experiencing discomfort from extended B3 use, as the slightly different thumb contact distributes pressure differently across the hand.
Significance: Maximum topspin and slice capability on the forehand serve. Advanced grip requiring precise technique. Secondary option for experienced servers seeking additional serve variation.
B5, B6, B7, B8 — The Underside Bevels
The four bevels on the lower half of the handle — B5 through B8 — are less commonly referenced in serving but matter significantly for rally shot mechanics.
B5 (right bevel) is the natural forehand attacking grip reference. With the thumb contacting B5, the racket face opens into the forehand smash and drive position. This is where most right-handed players’ thumbs naturally sit during hard forehand exchanges.
B6 (lower right) adds additional forehand power for drives and jump smashes. The thumb pushing through B6 during contact acts as a lever, accelerating the racket head through impact. Less commonly used in serving, highly relevant for fast downward attacking shots.
B7 (bottom bevel) is a neutral reference — the bottom of the handle sitting directly opposite the top B3 position. Most players pass through B7 briefly during grip transitions but do not use it as a primary shot grip.
B8 (lower left) bridges the gap between the underside bevels and B1. Like B2 on the upper left, B8 is a transition bevel rather than a primary grip position.
Significance for rallies: B5 and B6 govern forehand power and attack mechanics. B7 and B8 are transition reference points. Understanding these four bevels helps players diagnose why their forehand attacking shots lack pace or consistency.
Why the Bevels Are Overlooked
The eight bevels are overlooked for a simple reason: badminton coaching culture prioritizes shot outcomes over grip mechanics. Coaches teach players to hit the shuttle to a target. They rarely teach players to feel which bevel their thumb is on, or what happens to the racket face when that contact point shifts by one bevel position.
The result is that most players — including competitive club players with years of experience — grip by feel and adjust by instinct. This works well enough for standard shots. It becomes a ceiling when trying to develop genuine serve deception, because deception requires holding an identical grip across multiple shot outcomes. That requires knowing exactly where your thumb is on the handle at every moment of the serving motion.
Players who take the time to learn the bevels explicitly gain something the majority of their opponents don’t have: a precise, repeatable grip language. Instead of “it feels slightly off,” they can identify exactly which bevel adjustment is needed and make it deliberately. That specificity accelerates development and makes technique reproducible under match pressure.
Start With the Two That Matter Most
You don’t need to master all eight bevels immediately. Start with the two that have the highest impact on your doubles serve game right now.
B1 for your backhand serve — find it today, confirm your thumb is anchored there on every backhand serve you hit, and build your low and flick serves around that single reference point.
B3 for your forehand serve — find the top bevel, place your thumb there, and begin exploring how the wrist freedom that position provides allows you to vary your serve outcome without changing your preparation.
Everything else — B4 topspin, B5 and B6 rally power, transition awareness through B2 and B8 — builds naturally on that foundation.
Build Your Complete Serve System
If you want to go deeper on grip mechanics, serve selection, and the complete doubles serving framework built around these principles, the Doubles Serve Mastery guide covers every component in detail.