
Playing doubles badminton presents a distinct strategic challenge compared to singles. Success hinges not merely on power, but on effective partnership, intelligent court coverage, and precise positional awareness. Optimal badminton positions are crucial for converting rallies into points and avoiding defensive lapses. This guide aims to elucidate these positions and movements, fostering enhanced team synergy and performance.
Key Takeaways
- Strategic court positioning and movement are paramount for comprehensive coverage in doubles badminton, directly impacting shot success rates.
- Offensive play typically involves an aggressive stance, often with one player at the net and the other positioned for powerful smashes from the back, maintaining consistent pressure.
- Defensive strategy emphasizes broad court coverage by both players, preparing to return shots and initiate counter-offensives.
- Specific formations for serving and receiving are essential for legal execution and readiness for the subsequent return.
- Effective communication, both verbal and non-verbal, is indispensable for coordinating badminton positions and movements between partners.
Understanding Badminton Positions For Doubles
In doubles badminton, understanding where you and your partner should position yourselves on the court is fundamental. It transcends mere shot execution, focusing on strategic court coverage. Mastering positioning is a critical component of success.
Visualize the court as a divisible area that must be comprehensively covered by both players, irrespective of whether the team is attacking or defending. This requires a systematic approach rather than random movement. Furthermore, adapting to your partner’s playing style—whether they excel at the net or prefer the backcourt—is essential for optimal formation.
The Importance of Strategic Court Coverage
Effective court coverage is vital to prevent opponents from exploiting open spaces. Similar to defensive principles in other sports, leaving gaps in doubles badminton can lead to easily lost points. The larger court area in doubles necessitates coordinated efforts to minimize open zones. This involves anticipating the trajectory of the shuttlecock and maintaining readiness for movement. Comprehensive strategies for court utilization can be explored further here.
Adapting to Partner’s Play Style
Synergy with your partner is crucial. If one player is a net specialist and the other prefers the backcourt, a balanced formation must be established. This might involve one player dominating the net while the other supports from the back, or adopting a side-by-side defensive posture. Understanding your partner’s strengths, such as their clearing ability, allows for strategic positioning, such as playing closer to the net with confidence in their backcourt coverage.
Mastering Rotational Formations
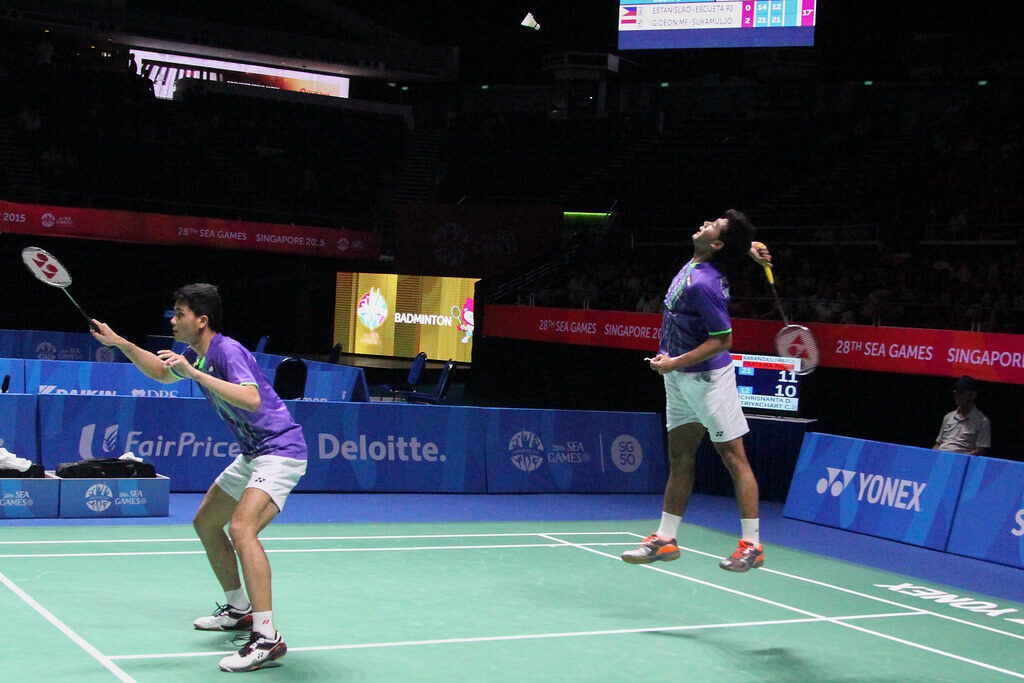
Rotational formations dictate the movement and switching between positions during a rally. Common formations include the front-and-back (attacking) and side-by-side (defensive) setups. The front-and-back formation typically places one player at the net and the other at the back, ready for offensive actions. The side-by-side formation involves players positioned horizontally to cover the court’s width during defense. Seamless transitions between these formations are key to maintaining court integrity.
The objective is to present a cohesive defensive and offensive front, thereby challenging opponents to find exploitable weaknesses. This requires continuous awareness of your partner’s position and the shuttle’s flight path.
Common formations include:
- Attacking (Front-Back): One player positioned at the net, the other at the backcourt.
- Defensive (Side-by-Side): Players positioned horizontally to cover the court’s width.
- Transition: Dynamic adjustments between formations based on rally dynamics.
Offensive Badminton Positions
Offensive positioning in doubles aims to exert pressure on opponents, induce errors, and create scoring opportunities. This requires aggressive and calculated placement on the court.
Dominating the Net Play
Controlling the front of the court provides a significant tactical advantage. The player at the net must be agile and prepared to intercept shots. Executing sharp, angled shots or quick, deceptive drops can force opponents into difficult lifts, creating opportunities for the backcourt player to attack.
Executing Powerful Attacks
While net play is crucial, the backcourt player is responsible for executing powerful smashes and deep clears. When one player occupies the net, the other must be positioned to receive clears and lifts, enabling them to deliver smashes or deep clears to push opponents back. This dynamic interplay aims to create openings for decisive offensive actions.
Front and Back Formation Dynamics
The front-and-back formation is a standard offensive setup. The player at the net focuses on intercepting low shots, playing volleys, and blocking, requiring agility and quick reflexes. The backcourt player is responsible for delivering deep clears, executing smashes, and covering the back corners. Effective communication and coordinated movement are essential for this formation’s success.
Key roles in this formation:
- Net Player: Intercepts low shots, plays volleys, blocks, and requires agility and reflexes.
- Back Player: Executes clears, smashes, and covers backcourt areas.
Fluid transitions between offensive and defensive roles are critical. If the net player is forced back, the back player must adjust to cover. This adaptability distinguishes proficient teams. Further insights into doubles strategy emphasizing these transitions are available.
Coordinated movement ensures comprehensive court coverage. If the net player moves laterally, the back player must adjust to maintain central coverage. This synchronized movement maximizes the effectiveness of the front-and-back formation in sustaining offensive pressure.
Defensive Badminton Positions
When facing aggressive attacks, adopting a defensive posture is necessary. This involves not only returning the shuttle but also strategically positioning to survive the rally and prepare for counter-offensives. A robust defense can effectively transition into offense.
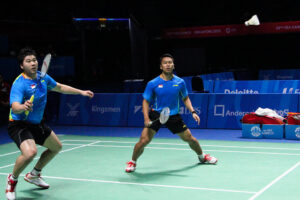
Side-by-Side Defensive Setup
The side-by-side formation is typically employed during defensive situations, particularly against powerful smashes. Players position themselves horizontally, each responsible for approximately half the court’s width. This setup minimizes open court areas for opponents to target. It requires balance and readiness for quick movements, making a split step crucial for optimal reaction.
- Player 1: Covers the left half of the court.
- Player 2: Covers the right half of the court.
- Objective: Maintain the rally and prevent opponents from scoring easily.
Effective Counter-Attacking Strategies
Defensive play should incorporate opportunities for counter-attacks. A well-placed clear can provide time to reset and reposition, while a sharp drive can surprise opponents. Even a controlled block can be effective if strategically placed. The aim is to disrupt the opponent’s attack and create openings for your own offensive actions.
Anticipation is key. Identify opponent weaknesses and exploit them, even during defense. A swift, flat drive can be as effective as a smash if unexpected.
Quick Reflexes and Anticipation
Defensive play demands rapid reflexes and anticipation. Reading the game, predicting the shuttle’s trajectory, and moving preemptively are essential. Consistent footwork practice enables instinctive reactions. Anticipating shots allows for early positioning, facilitating effective defensive returns. Staying a step ahead is crucial for sustaining rallies and achieving victory.
Key areas for focus include:
- Observe the opponent’s racket: Provides clues about the intended shot.
- Listen to the impact: The sound can indicate shot power and direction.
- Analyze body language: Indicates intent, such as preparing for a drop shot or a smash.
- Consistent practice: Enhances game reading and reaction capabilities.
Serving and Receiving Badminton Positions
Optimizing Server and Receiver Placement
Strategic positioning during serves and returns is critical in doubles. The server typically occupies the right service court for an even score and the left for an odd score. The objective is to execute a challenging serve and prepare for the subsequent rally. The server aims to make the return difficult for the opponents. The partner’s role is to cover the central court area, anticipating the return’s direction, and adjusting their position based on the serve’s strength.
The receiver positions themselves diagonally opposite the server. Their partner usually positions closer to the net, ready to intercept short returns or apply pressure on the serving team, thereby limiting angles and offensive options for the server.
Understanding Service Rotation
Service rotation in doubles requires adherence to specific rules to avoid errors:
- Initial Serve: The serving team commences from the right service court.
- Winning a Rally: If the serving team wins, the same player serves again, switching to the opposite service court.
- Losing a Rally: If the serving team loses, the serve transfers to the opposing team. The player who was to receive now serves, and their partner assumes the receiver’s position.
- Score Dictates Position: Court position (right or left service box) is determined by the team’s score; even scores correspond to the right, odd scores to the left.
Familiarity with these rules through practice ensures smooth execution.
Strategic Positioning After the Serve
Post-serve positioning is as crucial as the serve itself. Upon the shuttle entering play, both server and receiver transition to their designated rally positions. The server typically retreats towards the court’s center, adopting a defensive stance. The receiver’s partner, initially near the net, may maintain position to intercept weak returns or retreat as necessary.
Smooth transitions from serving or receiving stances to effective rally positions are paramount. Anticipate the likely return trajectory and position yourself accordingly. Coordinated movement prevents exploitable gaps on the court.
This rapid adjustment is a hallmark of skilled doubles teams, enabling proactive play.
Communication and Badminton Positions
Verbal and Non-Verbal Cues
On-court communication is integral to success. Establishing a system of verbal cues (e.g., “Mine!” or “Yours!”) or non-verbal signals (e.g., hand gestures) ensures clarity regarding shot responsibility. This minimizes confusion and ensures synchronized movement, preventing collisions and missed shots.
Building Trust Through Positioning
Trust between partners is cultivated through consistent and reliable positioning. Understanding and respecting each other’s strengths and weaknesses allows for strategic role allocation. For instance, confidence in a partner’s net play may permit a deeper court position. This mutual reliance fosters a stable team structure, enabling players to perform with greater confidence.
Coordinated Movement on Court
Effective formations rely on coordinated movement. This involves efficient transitions between positions and formations. For example, during a front-back formation, if a deep shot is played, the front player must adjust position to support, while the back player covers the smash. This synchronized movement ensures continuous court coverage.
- Anticipate the shot: Predict the shuttle’s trajectory.
- Move with purpose: Execute deliberate, efficient steps.
- Adjust to your partner: Complement their position and movement.
- Split step: Perform a small hop before the opponent hits to enhance reaction time.
Mastering Badminton Positions Through Footwork
Efficient footwork is the foundation of effective positioning in doubles badminton. It enables rapid and precise movement across the court, ensuring players can reach the shuttle in optimal positions.
Agile Movements for Court Coverage
Comprehensive court coverage requires agile movement in all directions, utilizing shuffles, lunges, and quick steps. This allows players to effectively reach back corners, approach the net, and cover central areas.
- Shuffle steps: Facilitate lateral movement while maintaining balance.
- Lunges: Essential for reaching wide or low shots.
- Cross-over steps: Enable rapid movement over longer distances.
Efficient Transitions Between Positions
Smooth transitions between offensive and defensive states, or between different formations, are critical. Sharp footwork allows for quick recovery after shots, such as returning to a central defensive position after executing a smash.
The split step is a crucial technique. Executing a small hop just before the opponent strikes the shuttle primes the legs for immediate directional movement, significantly improving reaction time and court coverage.
The Role of Split Steps
The split step, a brief hop performed as the opponent prepares to hit, is vital for enhancing reaction capabilities. Landing with bent knees allows for explosive movement in any direction. This action provides a critical advantage in the fast-paced nature of doubles badminton.
Steps involved:
- Anticipate: Observe opponent’s preparation.
- Split: Execute a small hop during the opponent’s swing.
- Land: Land softly with bent knees, poised for movement.
- React: Push off in the required direction.
Wrapping It Up
Effective positioning and movement are fundamental to success in doubles badminton. Strategic court coverage, seamless partner coordination, and clear communication are essential. By understanding and implementing various formations, practicing efficient footwork, and mastering communication, teams can significantly enhance their performance and achieve greater synergy on the court.
Frequently Asked Questions
What is the core principle of doubles badminton positioning?
The primary principle is collaborative court coverage, where partners position themselves strategically to cover the entire court effectively, minimizing opportunities for opponents and maximizing scoring potential.
Is it always necessary to stand beside my partner?
No, positioning varies. Side-by-side formations are common for defense, while front-and-back formations are used for offense. Adaptability based on the game’s dynamics is key.
How critical is awareness of my partner’s movements?
Extremely critical. Synchronized movement prevents conflicts and ensures comprehensive court coverage. Communication, whether verbal or non-verbal, is vital for maintaining this synchronization.
What constitutes the optimal attacking strategy in doubles?
Optimal attack often involves one player controlling the net with deceptive shots while the other player positions for powerful smashes from the backcourt, creating pressure and forcing errors.
What is the recommended defensive posture in doubles?
The side-by-side formation is generally recommended for defense, particularly against smashes, to maximize court width coverage. The objective is to return the shuttle safely and transition to a counter-attacking opportunity.
How does footwork contribute to effective positioning?
Footwork is the mechanism for achieving optimal court positions. Efficient footwork enables rapid movement, quick recovery, and precise placement, ensuring players are consistently ready to play the shuttle.